![]()
Blog| Laundry Tips | Marghab Patterns | I inherited boxes of old linens, now what?
Marghab Patterns in Numerical Order | Living with Old Linens
washing, storing and caring for antique linens
CARING FOR YOUR ANTIQUE LINENS
If you discover, inherit or buy antique linens, you will eventually need to launder them. I hope that the following tips will contribute to your ability to use and enjoy your items. I love laundering antique linens and I hope that you will come to love it, too! Or, at the very least, you will not worry so much about it.
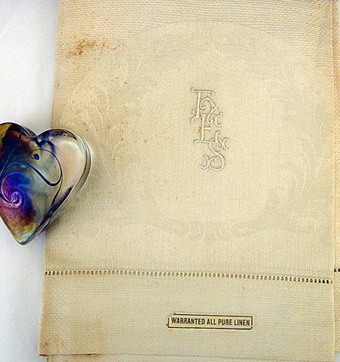
Old textiles are usually very sturdy and most are far more colorfast than some of the dyes we have today. (though sometimes not.) They were intended to last an entire lifetime, and often outlasted their original owner and were passed down for the next generation to use. When linens are stored, they invariably develop "age" or "storage stains" which has nothing to do with whether they were put away clean.
PLEASE NOTE THAT I DO NOT GUARANTEE ANY METHOD THAT YOU CHOOSE TO TRY.
Some items already suffer from dry rot, mouse nibbles and destructive rust. You will not be able to save these things if the fibers are already compromised. If you tug on two sides of a handkerchief, towel or pillowcase and it comes apart without much effort, your item has dry rot and has reached the end of its useful life. It may have looked pretty good, but it was already damaged. Throw it away, mourn it, move on.
Sometimes, you must let go.
TO START, BUY SUPPLIES:
Gallon of White Vinegar
Rust Remover
Restoration
Bleach pen
Laundry detergent (simple soap, nothing added)
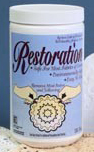 Order "RESTORATION" and its even-more-gentle companion, "Quilt Wash" from the manufacturer, Engleside Products of Lancaster, PA. (englesideproducts.com) Oxyclean is similar, widely available and less expensive; I prefer Restoration.
"Restoration" and white vinegar are my preferred products. When, in August of 2007, I acquired and then needed to launder priceless napkins from the estate of the King of Italy, I fearlessly treated these fabulous heirlooms with "Restoration" due to my trust in this product. Read the label and use common sense.
It will remove horrible storage grime but it is so effective that you may reach for it more often. I add "Restoration" in the washing machine with my family's laundry, too. It removes odors, age spots, storage stains, label stains and often, but not always, some rust. If it does not remove the rust, I use "Whink Rust & Stain Remover." Be aware that if rust has already eaten away the fibers that, by dissolving the rust with a rust treatment, you may be left with a hole where the rust had been. As with most products, I use less than the manufacturer recommends and I repeat the treatment on very stubborn stains or rust. You will be rewarded for your patience.
In the past, I tried almost anything that anyone had ever suggested or that I ever read about on very bad stains on whites. I've used (with varying results) automatic dishwasher detergent, white toothpaste, lemon juice with sunshine, stain sticks, sprays and bleach. After all that experimenting, I now use "Restoration" first and, if stains remain after two or three sessions with it, I put the dampened piece outside on the lawn in bright sunshine for a day. This is a magical solution; often horrible stains will disappear within an hour. The magical part is that I have been off doing something else! If the item comes back inside and the stains persist, I may resort to using bleach with laundry detergent. I like to have a bleach pen on hand because it allows me to pinpoint where I apply the bleach. After using bleach, always rinse with white vinegar, then rinse again with clear water.
Some Examples:
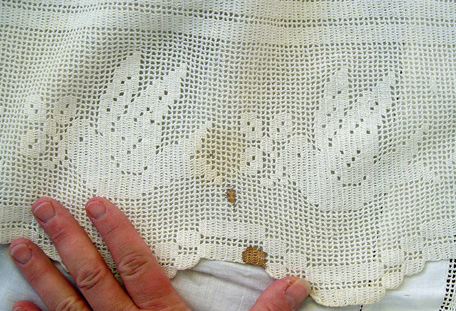
STORAGE-STAINED Tablecloth BEFORE WASHING
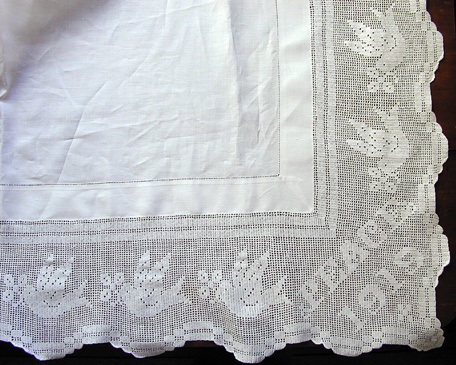
AFTER WASHING
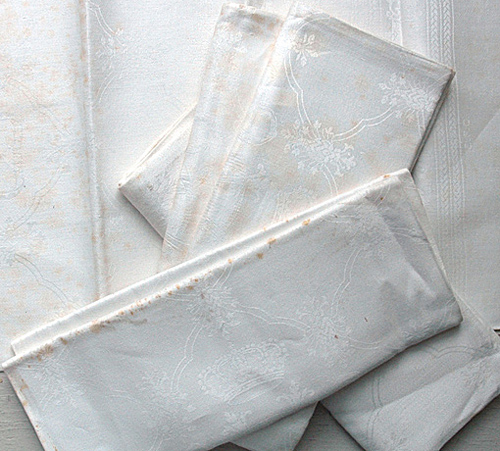
THE KING OF ITALY NAPKINS BEFORE WASHING
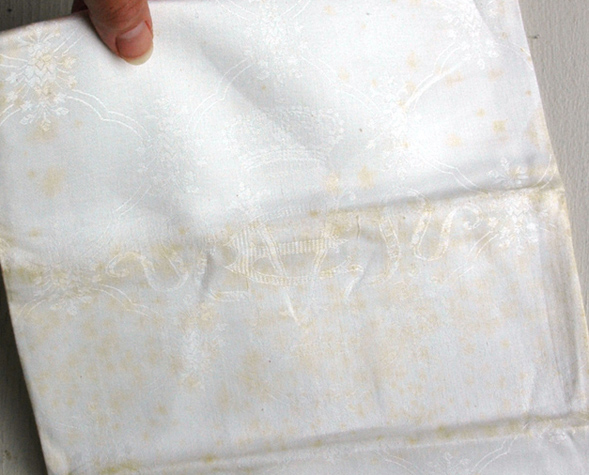
A KING OF ITALY NAPKIN AFTER WASHING:
How-To Wash Whites, Step-by-Step:
Step 1. Use hot water with "Restoration" until the water turns clear. (approx. 4- 6 hours or overnight) If the water is not clear after overnight soak, repeat this step. Extremely filthy items may require several soakings.
Step 2. Drain and refill container with water; add white vinegar (a splash or a cup, depending on container size); swish around and soak for 10-20 minutes.
Step 3. Drain and refill with lots of clear water; swish around and soak for 15 minutes. Done!
If stains remain, repeat entire process.
If there is rust, use rust remover on wet fabric, then repeat from Step 2.
If stains remain, lay wet/damp item outdoors on grass in sunshine.
If stains remain, soak with laundry detergent and small amount of bleach. I am loathe to use bleach but if it is between making something usable or not, I will try bleach. Or use a bleach pen on small stains. It is better to soak longer using very little bleach. Rinse well.
NOTE:
I know you already know this, but don't mix chemical treatments. Pre-rinse items that may have bleach or detergent residue with vinegar to neutralize the bleach and then rinse twice in clear water before trying another treatment. Do not bleach anything after using Oxyclean or peroxide or any other chemical treatment. Your items may turn permanently blue (or worse.) Rinse really, really well before trying any other product.
WASHING WHITES
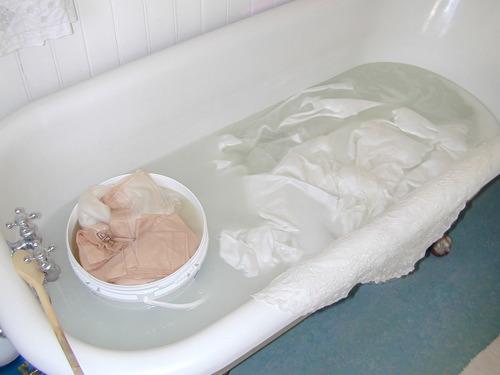
I fill my Victorian clawfoot tub with very hot water and allow items to soak for at least six hours with "Restoration." You can use a bucket, your bathtub or sink. I often add a teakettle full of boiling water to make it even hotter. The hotter, the better. I use a wooden stirrer to poke and swish them. Then I drain the water. My preferred method is hand washing, soaking in a tub or bucket, which may or may not be right for you. That's my tub, above, with a bucket inside to keep some smaller items separated. Using a washing machine on the gentlest cycle and without a spin cycle is an alternative.
I refill my tub with warm water and a cup of white vinegar added to pull any remaining soap or chemical residue from the fibers. Then, I drain again and refill for another rinse or, sometimes two. After the final rinse, I drape my items against the tub walls to drip. Or, I let them sit in the empty tub for a while to let as much water drain as possible. They get piled on top of one another and may drip there for a day, or even two days until I find time to deal with them.
Boiling used to be quite common, but when I think about it, who has a boiler big enough to hold a large and heavy linen sheet or a large tablecloth? I can't quite imagine doing it on the stove in a pasta pot!
WASHING COLORS
Trickier. And never guaranteed. Do not wash them if you are not prepared to lose them. Completely dissolve a generous amount of salt in cold water, then gradually add detergent, then your colored items. This is supposed to prevent bleeding. However, I have discovered that nothing is foolproof. Since some cleaning products work better in warmer (or HOT) water, I may add some. Don't mix colors. I launder colored items individually.
Alternatively, soak an item for 5 minutes in cold water into which white vinegar has been added. "Restoration" can be used on colors, but always test for color-fastness first. If the dyes are fugitive, meaning not colorfast, nothing with water will work. If an item is filthy, smelly and can't be used or displayed the way it is, I just take the risk. Yes, I lose some.
WASHING DELICATE or FRAGILE ITEMS (LACE, CHRISTENING GOWNS)
Small or delicate items should be washed separately. Handle very gently. Launder them inside mesh pouches, pillowcases or zippered pillowcovers. Squeeze to remove water, do not twist or wring. Or, soak and rinse it with a layer of fabric beneath it; when you are ready to lift it from the water, lift by the fabric which will support the item.
WASHING LARGE, UNWIELDY ITEMS (SHEETS, TABLECLOTHS, BEDSPREADS)
Large items are hard to handle and get even harder and heavier when they are wet. I washed a fragile mid-19th century white wedding quilt using a cotton sheet underneath it to support it. That wet fabric with the wet quilt on top was brutally heavy and hard to handle... but it worked. Fabric is heavy; add water (which weighs 2.2 lbs per liter, or 8.34 lbs per gallon) to the fabric and, yikes! that's heavy!
WASHING FRINGE
Tangled fringe is scary looking! But restoring fringe it is not as difficult as it looks. Rule #1 is to be patient. Do not even attempt it until you are in the right mood.
Here are my suggestions:
1. Before washing, pull the fringe into a pony tail with a fabric-covered elastic hair band. if there is fringe on two ends such as on a show towel, tie each end separately. You want to keep the fringe from co-mingling. Let it get nearly dry and remove the band(s) just before ironing. Keep a wide-tooth comb handy. I have an impossibly patient friend who will sit with a pin and "pick out" the fringes thread by thread. You are welcome to do this!
2. This method is more of a pain, but when done well it produces nearly new-looking fringe. Float your item in the bathtub, arranging it in the water so that you can maneuver it to drip onto the tub wall. If there is fringe on two ends, fold the item NOT in half so that the fringes of each end do not intermix. In other words, you want to end up with the fringe of one end hanging directly above the fringe on the other end. Carefully pull the item up and over the side of the tub so that the fringe falls straight down and plasters itself to the inside side of the tub. If some of the fringe is in disarray, pour water on it from above. This floats the fringe down into straight, separate threads. Tuck the folded fabric over itself so that it drips inside the tub as much as possible. Leave it in position until it is nearly dry.
3. Use creme rinse/detangler in a rinse; it can be helpful. Follow with a rinse of plain water.
RINSING
Keep white vinegar on hand and use it in the first rinse. It will pull any remaining residue from the fibers. Follow with a clear rinse. (or two)
DRYING:
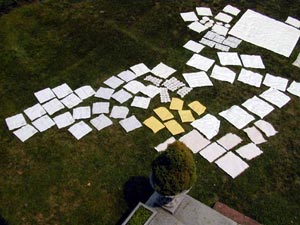
Hanging to dry is my preferred method, often from my shower head if the weather does not allow me to hang them outside or to lay them on my lawn. Another benefit of hanging them to drip dry is the moisture they add to the air during winter. I love to lay things on the lawn. When a friend googled my house once, my backyard had weird white shapes: the google maps satelite photo was taken on a day that I had oodles of laundry out drying on my lawn. We got a great laugh out of that!
 In fair weather, I often scoop the sheets directly from the lawn and pop them back on my bed without ironing. They "lawn dry" surprisingly flat. Since I don't often find time to iron my own sheets and I don't mind the slightly disheveled look, it works for me. If I need to, I will resort to using my dryer but it is my least favorite method as everything wrinkles.
In case it has crossed your mind, lawn drying does have its hazards. My neighbor's cat once thought I put the tablecloth out for him and I found him plopped down in the middle of it. Rewash!
Birds sometimes poop on the item.
Rewash!
Insects sometimes poop on the item.
Rewash!
Insects sometimes end up in the item and get smashed.
Rewash!
To sum up your drying options...
Either hang things to dry over a tub or shower, hang them on a line, lay them on the grass or fold them against the bathtub to drip inside the tub. I have layered a few dozen wet napkins and waited for them to slowly dry over the course of a day or two in preparation for ironing. I may put items in the dryer for a few minutes when I am desperate, but I try to pull them out while they are fairly damp. I do not do this often and I hesitate to even mention it but I know my intrepid readers will question it, too.
The dryer "sets" wrinkles and it becomes more work to iron them out. I find that sheets that have dried on the grass look good enough (to me) to be put back on beds without being ironed. Try it if you do not require perfection. If something is fragile, soak and rinse it with a sheet of fabric beneath it; when you are ready to lift it from the water, lift the fabric which will support the item.
IRONING
Ironing has been a chore for thousands of years since the Chinese discovered that "smoothing" an item gave it a particularly nice appearance. The Chinese first did it cold, though. Hot irons were impossibly hot and heavy and dangerous and we are incredibly lucky to have electricity to make it much easier, but ironing can still be a chore. If I had any one complaint about ironing, it is that today's irons do not get hot enough. I use a mid-20th century mangle iron which gets dangerously hot. Mine is a vintage "IronRite" mangle iron. I even press my jeans on it.
The goal is to iron your items until they are completely dry. It may not always be possible but that is the goal. If they are left ever-so-slightly damp, they happily wrinkle themselves as they dry. After ironing, hang them on drying racks for a few hours so that any residual dampness has a chance to completely evaporate while they are still in "formation." The drying rack could be a true drying rack, a towel bar, a stair rail, lying flat across a bed, over the back of a chair, etc. Let them "exude" for a few hours; then store them.
Iron items with the wrong side facing the iron. I don't think this matters except for items with embroidery which you want to plump up instead of squish down. Iron your items while they are damp. The heavier the linen, the damper it needs to be in order to get out all the wrinkles. Try to time it so that items are still damp from washing (best, because they are then evenly damp throughout) or dampen them with a spray bottle. Freezing the damp things is supposed to make ironing easier. Wrap them in plastic and leave them in the freezer overnight or put them outside during the winter. Cover them with dry cleaner's plastic in your basket as you are ironing to keep them evenly dampened. It is nearly impossible to completely iron smooth some very heavy linen unless it is nearly soaking wet. Take a deep breath and start, then just keep at it until it is as dry as possible.
Turn off the steam in your iron and let it dry out completely. Two reasons: you avoid the dirty seepage that exudes from the press plate, even from new irons, and, since the goal of ironing is to get an item completely DRY, it makes no sense to add more water, prolonging the drying time. Iron with a dry iron at the hottest temperature you can get. (for linens and cottons, of course. Use lower temperatures for silks, wool or man-made fibers.)
If you are going to use an item or display it, you can starch it while ironing. Starch is a personal preference and it does add a measure of protection against stains. If I use starch, I use a liquid starch called "Linit" which I mix with water in a spray bottle. However, I rarely starch my items. It's one more step and I do not care! Old-time starch was cooked from potatoes and could attract insects which gobbled the textile fibers as they were going for the starch. So when you hear that insects and moths eat fabrics, mostly they were eating the starch and the fabric got in the way. Some moths do eat wool, though.
FRAGRANCES
I was once disappointed to find that the smell of the expensive French lavender-scented water dissipated almost immediately once the pieces dried, but fragrance is a personal preference. I do not usually like added fragrance in anything. Laundry or otherwise.
MARKING LAUNDRY & INVENTORY MARKS
Historically, tracking, inventorying and keeping sets together and laundry separated from the laundry of others has been a challenge. I do not know a lot about this but when people sent all of their laundry to Holland or to the West Indies (or even to the local laundress) to be laundered, there had to be a way for each item to come back to them. I am fascinated by all the types of laundry marks that have come through my hands. Items have come to me with indelible ink marks, embroidered marks, stamped marks, sewn-in woven tags, labels and iron-on tape. They also come with metal clamps, which used to horrify me, but now amuse me simply because I have gotten used to them.
My suggestion is to start a system of organization now no matter how small or large your linen collection is. You can keep track of your acquisitions in a notebook, on your computer or simply by saving your receipts. Definitely write a note about the item and keep it with the item. Note the item name, the date acquired, the price, the size and description and the circa date of its making. Especially with your family items, this information can be priceless. If you do keep your inventory notes in your computer, you can also keep a digital photo with it. My personal pet peeve is finding notes attached with huge safety pins that rusted over the years... hence I try to not puncture my items.
STORAGE
A general rule, (which is not always possible, I know, I know!) is to iron items just before you are ready to use them. Do not iron them if you plan to store them for a long time. If you do plan to store things for any length of time, store them clean, unstarched, unironed and loosely rolled in acid free tissue or in white cotton. Storing them ironed can cause creases to form or crack. Do not store them in plastic. Never. Got that? No plastic, NOT EVER.
Do not store them in wooden drawers, chests, trunks, suitcases or closets where the fabric can touch the wood. Wrap them loosely in clean cotton. Or, line the drawers with acid-free tissue paper or the acids in the wood fibers (even very old wood fibers) will leach out and stain your linens. You will be surprised how quickly they can turn yellow or brown and you will be dismayed by the fact that they need to be re-laundered.
Roll or wrap your "long-term storage" and valuable linens in acid-free tissue paper (which can be bought on-line from The Preservation Station, preservesmart.com.) Or, wrap them loosely in clean cotton. Old sheets and pillowcases work well for this. I hang my ironed pieces because they take up less space and they don't wrinkle but rolling them or loosely folding them is less stressful to the fibers. Store them dry, out of the light, but never damp and never in a damp place. Make sure they are thoroughly dry before you put them away. Have I said "dry" enough times?
Go through your linens once a year or so to take stock, check them and enjoy them. If you store things folded and stacked, re-fold them with different creases. Stack heavier items on the bottom with the delicate ones on top. Rotate your items, too, so that one item does not get all the use and wear out. Although this is another strategy. If you like to wear out something completely and then use your backup, that's okay, too! In other words, be true to yourself.
ONGOING MAINTENANCE
It really doesn't matter which detergent you use. Use what you have on hand but use a vinegar rinse to remove residue and rinse again very well after that. Soak your linens for a long time when they are really soiled. Pretreat stains with a stain remover. If you can, leave them to soak overnight, or longer. If you feel comfortable with your washer on a gentle cycle, you can use it. But be aware that fragile embroidery, hemstitching or drawnwork can tear under the strain of swishing and spinning.
OTHER STAIN REMOVAL TREATMENTS:
Sunshine Method
This is the least invasive method; it is effective and it's free. It also sanitizes.
However, sunlight does bleach and weaken fibers over time. Sunlight is destructive so I am not suggesting that you constantly subject your fragile items to sunlight. This method, used once or twice on a piece that would otherwise need to be thrown away, can be very helpful. It can remove stubborn stains and make a difference in the useability of your item. You can lay things outside in any season; winter snow is also effective. I'd caution against doing it in "mud season," though. You know who you are if you live in a place with mud season. If you don't know what mud season is, trust me, it is better to be ignorant.
The dry method:
This is for exceptionally fragile or delicate items which can not be immersed in water. Lay item on the grass in the sun and leave it for a few hours. Stains will lighten and will sometimes completely disappear. Turn over and leave again for a few hours. Repeat if necessary. Also, you can use a spray bottle to spray a very light mist on the item. Do not dampen. This will sometimes remove disagreeable odors.
The damp method:
Pretreat any stains, rinse and lay outside on the grass in the early morning or even the night before. Leave item in the sun. Visit it frequently to check it, turn it and dampen it with a spray bottle of water. You can soak it with your spray bottle. The sun does the work, interacting with the water and the chlorophyl in the grass. This also deoderizes and sanitizes. Bird or insect droppings are a downside to this method and I have had an occasional racoon or cat sitting or walking on them, too, but 95% of the time I can bring my sheets inside and pop them directly on the beds without a problem. And the fresh air smell is wonderful. The smell even lasts through ironing.
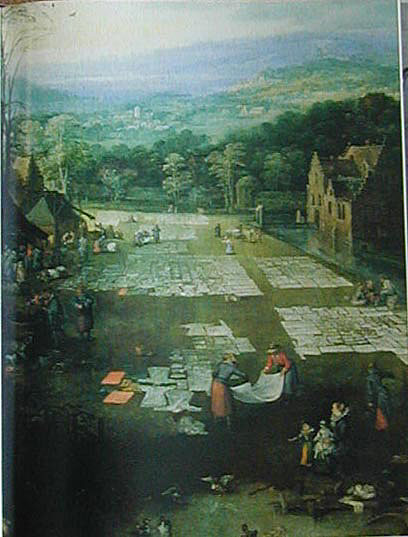
This painting illustrates the long history of this kind of care. It is "Flemish Market and Washhouse" by Pieter Bruegel (c. 1520-1569) and it is in the Prado in Madrid, Spain.
Enjoy Your Textile Treasures.
Copyright![]() 1998-2020, Cynthia Y. Cooper, Cynthia's Antique Linens.
1998-2020, Cynthia Y. Cooper, Cynthia's Antique Linens.